Sunday, April 29, 2012

Sami Lee Woolhiser: Serial Slice #1

Hey Everyone! This is the design and build of my practice serial slicing project. It kind of looks like an abstract architectural form, this would be an awesome building.

Here is the original form in maya shown in solid and line view. I created several pyramids and "boolean union"ed them together to create one cohesive shape. 
Form in Maya
Next I divided the structure up into many slices using a Rhino plug in called Grasshopper. The red lines show the slices that the laser will read later to cut into the material so the pieces can be stacked to create a 3 dimensional object.
Form with serial slices shown
Here are the slices organized and ready to be laser cut. The magenta edges indicate an outer cut, blue an innercut and red is text which is rastered in rather than cut all the way through.

Sheet#1


Here is the practice stack of the structure, Looks good-time to glue!
Practice Stack

 I glued and clamped the structure in three increments so it would dry neatly.


Friday, April 20, 2012

Sami Lee Woolhiser: Milling Project 1

Hey everyone!
Here is the texture I am milling for my first project. I plan to vacuum form this and manipulate it in multiple ways. 
Manipulated in photoshop
Live trace in illustrator
Separated the curves from the surface
Surfaces and curves
 Imported as a jpg I imported it under the command "Heightfield" where I could create a three dimensional surface based on the values of the image. I projected the outside curve to the cplane, created a plane and lofted the side curves of the plane and the texture in order to create a solid.
Heightfield


Tuesday, April 10, 2012

3D Kinect Scan


First post!...

I've been trying to scan with the Microsoft Kinect and have finally made some great progress on that.

I've been really interested in making art with the Kinect so when I saw an example on youtube on how to scan for 3d I got really excited and had to try it out. Using Processing, meshlab, and cinema 4d.

Problem is I am very new to processing. So I had a friend help me out. And was able to scan and save.


Took that .obj and found a great tutorial. So happens to be a Kyle McDonald tutorial on how to get the .obj point cloud to generate a mesh, in Meshlab. That guy is incredible.


Anyways, followed those steps which has led me to a pretty interesting image that i want to take into cinema 4d and be able to model a little more so it can be ready to print soon!


Wednesday, April 4, 2012

Sami Lee Woolhiser: Bird Scan Studio

This is my first post for this quarter! Here is my experience with Scan Studio so far.
First Scan
It is possible to transfer a 3 dimensional object in real space to virtual 3D space! Amazing! The 3D scanner traces the object, such in the image above where it scans on a 360 degree rotation taking pictures at a set number of intervals (10). Then I find corresponding points within those images that then align them in the program, Scan Studio, where it gives a virtual 3D object like the one below.

First Scan on Scan studio

Aligning two groups of scans (scan families)
 By scanning from a different angle of the bird I was allowed to fill in the holes created by the first scan, because it does not see segments that are perpendicular to it, with a second group of images (a second scan family.) Bellow is an image of the second scan in which the angle of the bird allows the scanner to see parts it couldn't in the first scan. Above is an image where I aligned the two scan families to create one happy little sleeping bird. 

Second Scan

two merged scans
 Above is the two scan families which are now aligned, below is an image of the multiple layers of images fused together. The red highlighted portion is the parts that I trimmed, removing the unnecessary parts the scanner picked up during the scanning process.
Trimming extra segments

Tuesday, April 3, 2012

Andrew F. Scott: Material Studies


Scanned Rhino Model in rhino

I had the opportunity to do a little more form exploration on the previous model from laser scanned data.  Within Rhino I used the nurbs surface tessellation as a cue for the surface activation of the model. Using pipes i created a series of sweeping linear forms across the surface of the model.
Mahogany


Polished Oak
I began with a series of monochromatic compositions using a single material I wanted to get a feel for the rhythmic movement of the lines across the surface of the material.


Mahogany with Cherry
 This led to an exploration of a combination of materials. This is where the fun really begins as you can begin to play material properties with and against each other.

Gold with Pearl
 I really like this combination of materials because it begins to suggest a form that can operate on a diversity of scales.
Gold with Mahogany


Monday, April 2, 2012

Andrew F. Scott: Laser Scanning To Milling


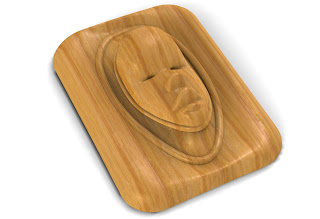
This is a keyshot rendering of a relief sculpture that incorporates laser scanned data. The model was scanned using a Next Engine Scanner. The data was processed using Rapid Works reverse engineering software. This workflow outlines how RapidWorks can be used to generate a variety of nurbs surfaces. While the focus of this posting is on  the CNC milling process, the same workflow can be used for FDM and Laser Cutting Operations.
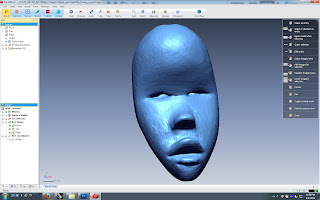

Once Scanned the data is brought into RapidWorks where it is cleaned up and prepared for both surfaces decimation which is used to generate polygonal data and a variety of operations that are used to generate surfaces. Using the AutoSurfacing function Rapidworks can generated two types of surfaces.
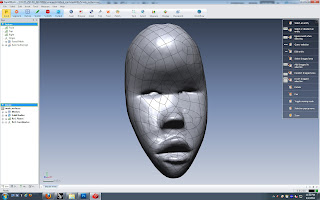
This is an example of a surface that is generated using an evenly distributed network of patches. Using this function will overlay a net-like surface of user defined quad patches that does not adhere to the contours of your object. The net like structure follows and adheres to the typology of the surface. Each patch has a user defined number of control points that is used to control the complexity of the patch network.
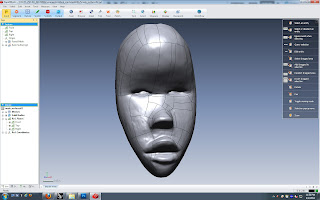
The Feature Following Network tries to follow the typology of your object more closely by generating a series of quad patches based on the contours of your objects. There are a variety of settings that can be adjusted to achieve different effects using this option. The main two focus on are Feature Detection Level and Geometry Capture Accuracy.
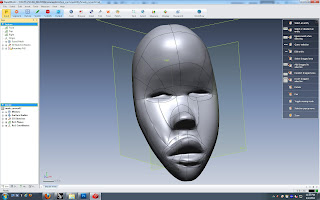

For the greatest degree of control and artistic expression you can draw your own patch typology on the object using the 3D Sketch Mode. This mode has a variety of tools for generating your patch typology on top of your mesh object. Above is a quick sketch of a patch network that I drew on the scanned model. As an edge loop disciple I will probably go back and redo the network so that the edge loops reflect the true contours of the model. This is important because these lines can be used to generate surface details as shown in an earlier posting of my fist model that focused on nurbs modeling and laser scanning.

I am very excited about this branch of research because it affords total control over the surface typology of scanned models. You can generate almost any surface pattern you want as long as it is composed of quadrilateral patches. The software will also generate boundary surfaces when you use 3-sided patches or patches with more than four sides. It prefers quad patches.
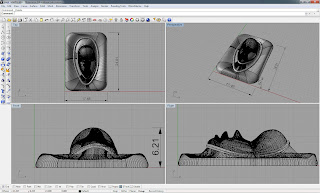

The patches are easily joined in Rhino into a polysurface. It is also easier to fix problem patches using the surface generation tools within Rhino. Once done your model can be incorporated into a variety of modeling techniques.


I am interested in exploring the potential of the scanned data using a variety of milling techniques that focus on surface typologies and its influence on the texture of the objects. This is only the beginning.