Monday, November 30, 2009


Thank you for helping me get the work to here!
Prof Scott is the BEST!

Thursday, November 26, 2009

Tuesday, November 24, 2009

Non-sphere


How cool would this look in stainless steel at 10 feet tall?!

This piece started as simply an exploration of space through a couple simple tools in Rhino. I printed it out in the 3D printer and the form is really engaging.

I presented this piece as a model to the class and got a lot of good feed back. I'd love to get commissioned and place it in a park or something.


Frozen Meat


My brother and I had a good discussion about "Frenemies" the other night. A frenemy is a person who doesn't care about you enough to be your enemy, and yet doesn't think you're valuable enough to be your friend. Avoid frenemies at all costs. They are more detrimental to your health than any enemy could be. They are traitors and they are false.

Among other things, this piece has to do with that "glass box" that certain people place you in. As a student and an athlete on the mend, I faced many mental and physical challenges this quarter. But, through much struggle and determination I broke from the ice. This piece is a personal metaphor for my own struggle in the face of enslaving "frenemies."

From this milled REN form I took a brush-on 40 mold and cast in plaster. I painted the piece red as symbolic for my own vitality and froze many layers of ice onto its surface. I presented this piece in full ice, allowing it to melt away during critique.

Sunday, November 22, 2009

Stuctal Lamp continued


Sometimes it takes some unexpected input to realize a project.

I found myself frustrated with the outcome of my laser cut lamp. It was meant to use all of the material from an 18x32 sheet of acrylic and it did but I felt that i could become more than just the slotted structure I first designed.

John:"I'm just not happy with plastic lamp, I wish I could ball it up like a sheet of paper!"
Anonymous:"yeah too bad you cant."


This is when I went off to the oven. melting all of the rectangular sections and twisting them together. I was now in a battle against time and the will of the material to find a pleasing composition.

The majority of my work is process driven and determined more by the potential of the material than an aesthetic foresight. This piece in many ways showed me how "interesting" feedback and unexpected uses of materials can create something beautiful.

-John Adams

Mudular |Potential

What started as a adjustable armature for surface construction became much more, and less, then I expected. This exploration began in a brainstorming conversation when Jonathan Anderson and I were trying to find a way to create a adjustable surface that would flex much like a surface in a CAD Program. Drawing inspiration from other modular structure I created a two component system that allowed for expansion horizontally and vertically. The design uses cross like shapes that slide together and can expand to a limited range. My fist exploration into constructing a surface revealed a few flaws in the design, but as others played with the modular components we also saw how they could be used to create other interesting forms.


Flickr Link

John Adams

Saturday, November 21, 2009

Project 3: Serial Cuts and Stacking

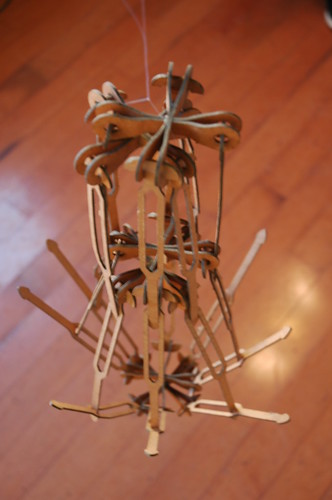
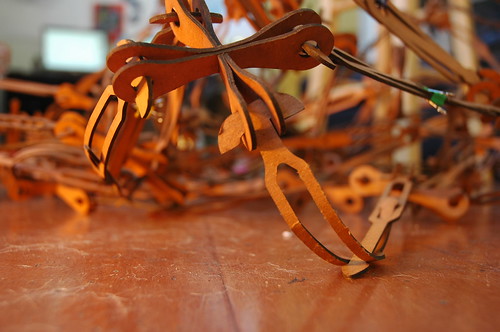
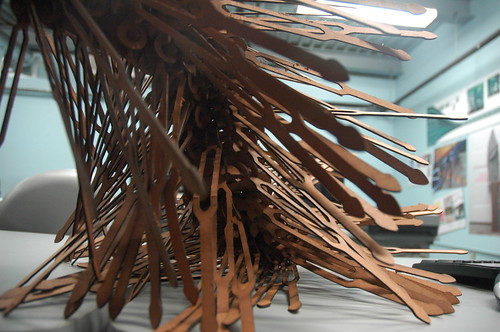
Project three was an experiment with dividing a model into slices to easily construct them out of material. The first attempt with the "Dino" lamp(first above image) was a success. Constructing the second model was not a success, the pieces did not clearly represent the original digital model well. The third attempt at serial stacking the piece out of cardboard displayed the digital model successfully and added interest to the piece.

Tuesday, November 17, 2009

In the sky


my hope is to someday make this sculpture out of clear glass.
The FDM model offers some clarity to the details of the file.

a massive massive unroll


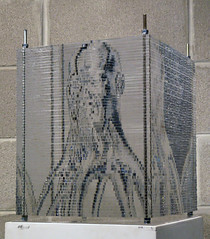
On the left is the massive unroll file which will help me create the sculpture on the right. I placed the image in Hyper-crack and made it look a little like the Batmobile. in a dark glass. I will be ready to cut this out of LOTS of cardboard and the finished work will measure about 20 X 30...
This is a work which on file I refer to as soap afloat. but it really does help out as a piece in evolution of the rise of virtual life experience in tantrum with the demise of human existence on earth. Sorry for that depressing message. Maybe Batman will
save the day....

Sankofa


My day was made today when John Adams and Ricki Dwyer said to me that their sculpture was created in the spirit of Sankofa an Akan word meaning "Go back and fetch it". It embodies the need to understand your past so that you are prepared to step into the future. Made my quarter.

Week 10: Work In Progress


Week 10: Work In Progress
Originally uploaded by afsart

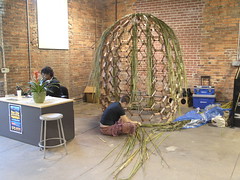
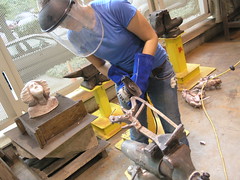
A collaborative Sculpture by John Adams (Industrial Design) an Ricki Dwyer (Fibers). This work combines digital fabrication and basket weaving techniques.These photos depict the work in progress which will be complete for finals in two days. This is an excellent example of both the collaborative and high-tech high touch ethos of the sculpture minor program.

Monday, November 16, 2009

Shannon Slane: FDM


Ever since I saw my beautifully talented friend Falynn Koch's illustrations of a pregnant rat, I'd wanted to make it in the three dimensional world, and also turn it into a lamp; which occurred to me because her drawings illustrate the rat in darkness and again in light.

I love a surprise, and so in much of my work I try to incorporate an element of discovery. I feel this gives an audience a sense of connection with me and my imaginings, and it creates an experience, which I feel that all good art should do for a person on some level.

To start with, I designed mamma rat and her offspring in Rhino, and had the whole family cnc printed. I then primed the rat, added a texture to the fur, and created a silicone OOMOO 25 mold for her.

Tonight, I plan to cast everybody with Smooth-Cast 300, and then hollow out mamma rat and turn her into a lamp. I plan to poxy the babies against the sides of her belly, so you can see their outlines within her when the lamp is lit. If this does not yield the result that I'm looking for, I plan to paint black dotted outlines inside of the lamp, as in Falynn's illustration. I'm also going to add felt ears to the final product. I wanted some part of her to be soft! This also will add to my plan to make her look somewhat scrappy; she is all knocked up after all.

More to come, and soon!

Shannon Slane: Eureka!

When I first designed my 3 dimensional repeat pattern for my Digital Sculpture Application class at SCAD, and had it cnc printed, I knew that the way I was going to make multiples was to vacuum form a material over it several times. I then wanted to make a large piece of wall art out of my many pieces.

But how to color them? Should I? What kind of material should I use? I assumed that I would work with some kind of acrylic plastic, as this is the most common material used in the vacuum forming process, at least in the Industrial Design Department here at SCAD. I've done research into the different kinds of plastic available, and no quality of a single one stuck me as entirely right for this project. Nothing stood out in any way. Additionally, to cover a wall with acrylic would be entirely too expensive for me at this point in my artistic life.

Feeling somewhat discouraged, I headed to the Home Depot anyhow, thinking I could purchase a thin acrylic sheet of plastic, make a decently sized piece and spray it with a flocking gun, or just simple spray paint it. St some point the thought of doing a Pollock- esque action painting over it seemed as if it might be the answer, but clearly I was slightly losing my mind in the scramble for a solution.

Then I ran into some colleges who were working on a project for another class. One of them mentioned that you can vacuum form craft foam.

I made a mad dash to Michael's, and bought a large sheet of white, and every piece of royal blue craft foam they had to sell (only 36 in all, but the end product is larger than I had anticipated I could afford out of acrylic).
Once in Gulfstream, I tested the vacuum forming process with the white foam and a scrap piece of pink foam, and WOW! Every minute detail was picked up, and when you smash the material it remembers it's form and springs back to life! This discovery sold me on the material, and I began working on my piece.

As you can see, the material works beautifully on the pattern I created. The process is easy, you simply peal the foam off your finished product and reset it to vacuum form again. No agonizing about acrylic permanently encasing your mold, or splitting it in half during the forming process. Plus, it's cheap! When I do this next, I'm going to order the material in bulk, and get each sheet for 69 cents instead of 99. It would be completely affordable to create a pattern that covered an entire wall - and I'm already thinking about fine art as well as commercial applications. I could sell this to parents who want a fun nursery for their child, but don't want the permanence of paint or a wall sticker, and who would also appreciate having soft cushy walls. This is safe and fun, and the tactile nature of the material is good for a developing brain. As for a fine artapplication, you'll have to follow my blog, wait, and see!

Here are some more pictures of the process:

Some Grasshopper Eye Candy


-John Adams

Sunday, November 15, 2009

John Adams: Exscind Complexity


Exscind, meaning to cut or dissect, is a reference to the multiple layers of deconstruction of an 3-D object to to create a complex 2 dimensional image. Staring with a stock polygonal head model Maya was used to convert it to a poly surface nurbs model.


Then imported to Rhino the model was broken down further by contouring the model in an angled serial study. The relation of three dimensional lines in a two dimensional medium was the examined to find a two dimensional composition and transition of lines that could not been through a solid object.

Exporting this overlapping network of vector lines to Illustrator allowed the final step to creating the final image. Adding fill to all of lines from the poly surface nurbs created a overlap that covered some lines and bringing other forward.

This exploration process has given me insight into the potential of combining programs and the tools they offer. In the words of Professor Scott, "it doesn't matter what program because it's all in the file format". When thinking about the nature of different digital file formats, I have found it best to consider them as different mediums. Each have their own feel, potential, and limits in this was I would consider process mentioned above as an example of mixed digital medium.

Flickr Link

-John Adams

Janelle Wheelock: Digital Kiln Formed Glass


Once again we break new ground in our digital applications for sculpture. I thought I would share these images of Janelle's work after they completed their second slumping operation. During the first cycle we didn't take the kiln up high enough. The pieces did not slump completely. The second attempt was a lot more successful. The glass pieces slumped over the ludo molds perfectly. In this process she went from a computer model to a CNC milled wooden form that was then molded using Brush-On 40 urethane mold materials. The ludo was then cast into these molds. Now that is a Digital Application for Sculpture. I will let her talk more about it in her postings.

Headlight


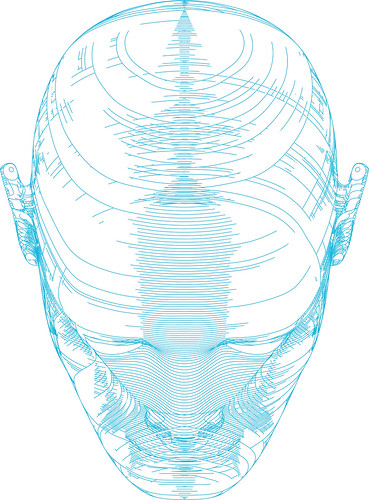
The profile image of the face was drawn using as a curve, in RHINO, rotated into a 360 degree vessel-like form. The Ribs holding the face image upright are cut from a secret script compliments of circles of friends of Prof. Scott. (Thanks for letting me carry on with lots of visual puns...)

ART and ENLIGHTENMENT
Here it is lit and on a table next to a crystal perfume container which belonged to my mother. Very fitting since the face-vase imagery comes to us from:
Rubin's vase (sometimes known as the Rubin face or the Figure-ground vase) is a famous set of cognitive optical illusions developed around 1915 by the Danish psychologist Edgar Rubin.

Saturday, November 14, 2009


final project. will see how its constructed, the plan is to vary the segments in proximity to each other. all things are subject to change as i put it together.

one sheet, evil lamp

Tuesday, November 10, 2009

scpt250/450: playday


SCPT 250/450 PlayDay
Each quarter as an introduction to formatting files for laser cutting we channel our inner 6 year old and construct forms from modular units that have been cut on the laser. This quarter the theme was animals. As usual it was one of the highlights of the quarter.

Sunday, November 8, 2009

BlackManGrove: Black Ice 1109


BlackManGrove: Black Ice 1109
Originally uploaded by afsart

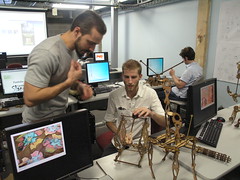
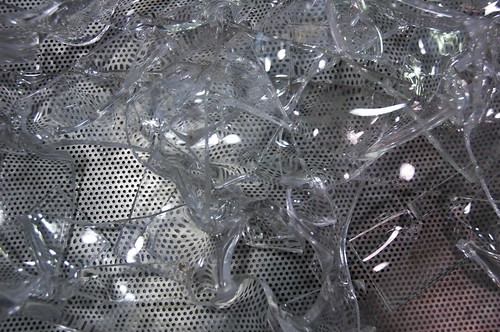
An extension of an earlier work "Soul On Ice". In this work the form of the BlackManGrove is encased within a cubic framework. The Object within is revealed through the interior contours. I love that the three dimensional form is revealed within based on the light and the viewers location from the piece. The refraction and reflections of the light reveals the modeling of the form.

Tuesday, November 3, 2009

Stuctal lamp

Looking at the project constraint of using a single sheet of material to create a lighting piece a saw in interesting opportunity. In many contexts from commercial products to sculpture, material usage can be an afterthought. Wanting to waste the least amount of material as possible I decided to break down the 18"x32" laser cut bed into rectilinear shapes.


I then arranged them in a structural and nearly architectural composition, before cutting notches to assemble the lamp after it was cut. This exploration in developing a lit piece serve as a interesting exercise of deriving a sculptural form from responsible material use.

-John Adams

Monday, November 2, 2009

Project 3: Serial Forms

Project 3 is about learning to construct a form by dividing it up into serial planes. This form was created using the line tool to create a profile. Then, the revolve command was implemented to make a solid form (seen below on the left).

The section command broke up the mass into individual pieces (below on the right). A mathematical script was provided to calculate and add appropriate connections to the pieces allowing them to be fit together like puzzle pieces.

Another script was applied after the piece was finished that placed each piece side-by-side. The pieces were then arranged in a grid 18x32 (the length of the laser bed) and color coded for the laser printer.

Alli Hall: From Binary to Bronze


Alli Hall SCAD Atlanta 10/23/09
Alli Hall continued her exploration of Digital Applications in Sculpture that she began during the summer of 2009. This fall she made a mold of her FDM model of her " Coral Sculpture" that was created during the summer quarter. Once completed, she created a wax positive that was sprued and gated for ceramic shell bronze castings. She had the pleasure of pouring the piece herself on October 23, at SCAD Atlanta. Here you can see her cutting away the sprues on her sculpture. Alli gets kudos for being the first SCAD student to cast bronze from an FDM model as a sculptural application.