Friday, April 30, 2010

Yuma Watanabe Project2: FDM Squid Project


For my second project,
I decided
to introduce organic object: A squid. However, if I made just a squid, my work would not be so interesting or artistic.

So I researched about a squid and found out that a squid and an octopus have blue blood instead of red blood as animals.
Furthermore, I found out that there is a movie called "Blue Christmas"(http://en.wikipedia.org/wiki/Blue_Christmas_(film)).

From the story of "Blue Christmas", I got inspired to create this model which is a squid has a baby inside of its head.

It might be hard to tell that a baby is inside of squid's head by looking at wire-frame and black plastic material versions, but if you carefully look into the head of blue Christal squid, you can tell that there is a baby sleeping upside down inside of the squid's head.


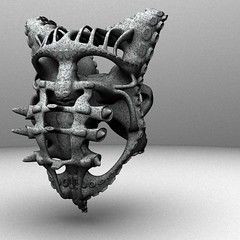
I saw Professor Scott's Mask today in the class.
It has interesting texture which could be seen through the Mask's surface.
That material made me sure that my squid would come out nicely as well.
Professor also told us that we can see our works on Tuesday.
I cannot wait until then!

Thursday, April 29, 2010

afsart: SCPT250 Spring 2010


afsart: SCPT250 Spring 2010
Originally uploaded by afsart

One of the abiding principles of SCPT250 is the 40% principle. This principle reflects the attitude that when you get your object back from the fabrication technician you are at the 40% stage of the sculptural development of your object. One of the ways that we encourage further sculptural exploration of objects created through the milling process is to create molds of the artwork. This accomplishes several things. First, It diminishes the preciousness of computer aided manufactured object. It encourages students to think of digital fabrication as an intermediate process in the exploration of sculpture and it presents the opportunity for further material and process explorations using the computer generated forms.

Saturday, April 24, 2010

Andrew F. Scott: Project 2 FDM Mask


afsart: mask
Originally uploaded by afsart

This model is an abstraction of a mask form. It is an extension of my continuing explorations of polygonal modeling techniques in maya. This geometry began as a cube primitive that was articulated using surface extrusions and polygonal bridges. FFD and Twist deformations were used to further transform the form that was then subdivided to add more detail.

The model will be FDM printed using a new translucent material. I am very excited about this and can't wait to see the finished print. The model was designed to fit within a 8"x6"x6" build envelope.

Wednesday, April 21, 2010

Jonathan Sells Project2: Goblin Head Bust

Using Maya for modeling and Rhino for output the following geometry was constructed. First in Maya the model was cleaned up then smoothed at a subD of 2 on each object. Next the geometry is exported as an .obj file and in Rhino extra cleanup tools are run such as CheckMesh and ShowEdges. After resized to dimensions the file is exported in .stl format. In order to have the model hold correctly when printed, the eyes, gums and teeth had to be placed touching a parcel of the head geometry. Unlike milling, FDM printing does not mind undercuts but the geometry must obviously be clean as with any 3d printing process.

The geometry for FDM had to fit in 5 x 5 x 6.
My dimensions were 4.05 x 4.44 x 5.50


Email: jsells20@student.scad.edu

Blog: http://jonathansells.blogspot.com/

Screen capture from Rhino


Render from Hypershot using a matte white material


FDM rough cut photograph


Saturday, April 17, 2010

'Information Ate my Table' production process


'Information Ate my Table' production process
Originally uploaded by Zachary Eastwood-Bloom

Zachary Eastwood-Bloom excellent application of CNC Milling technology

Wednesday, April 14, 2010

Jonathan Sells Project1: Nurbs Torus Study

Using Maya I created some torus primitives and manipulated each using a deformer and sculpt tools. Next I exported the file as an .iges format. In order to prevent undercuts for the milling process in Rhino I went in and tweaked the pieces of geometry then used the Boolean operation to seal the object as one with the base, leaving no naked edges.

The geometry for Milling had to fit in 16 x 10 x 4.
My dimensions were
15.67 x 9.45 x 2.52

Email: jsells20@student.scad.edu
Blog: http://jonathansells.blogspot.com/

Screen capture from Rhino


Render from Hypershot using a metal material


Milling foam cut and mother mold


Vacuum Form

Tuesday, April 13, 2010

Yuma Watanabe's Project1: Laughing Buddha

1st step of my approach of my project was creating template with Adobe Illustrator.
I used Pen Tool to get these outlines.
The Illustrator file was saved as Dxf files then imported in Rhino.
This is my wire frame outlook. I took around a week to come up with concept,
and 1 entire day to model this beautiful laughing Buddha.

These are my material selections. I think the picture in the middle is the best looking.
I was so excited to see my lovely Boddha, however, Prof. Scott told me that my file is messed up.
I could not believe it! How could it happen!?

Well, this is why. Can you see pink lines? These are all naked edges...
This is totally my fault. Even though I have another file to submit, that is not my will.
So right now, I am fixing the file and trying to catch up my classmates.

Yuma

Saturday, April 3, 2010

Router cutting text - 3X speed


Router cutting text - 3X speed
Originally uploaded by phidauex

A cnc mill in action