Monday, July 26, 2010

AFSart:Black Power Nkisi | Pepakura


Andrew F. Scott: Black Power Nkisi

Laser Scan

This post will provide a brief and concise overview of the laser scanning process and the application of the scanned data to digital fabrication.

It begins with a laser scan of a fist created from an algeanate cast. The scan is created using The NextEngine desktop 3d scanner.


Note the red dots on the models below. They are registration Pins used to align the various scans created as the model spins on the platen. After reading the operations manual I repainted the model white. Matte surfaces were also recommended to improve scan quality.


Once the scanning process is complete the registration pins are used to fuse the scanned parts together. The parts are scanned into families. Within each family only one pin location is needed to fuse scanned parts together. In different scan families at least 3 pins are needed. Each family represents a different orientation of the model. Once fused the models generally have more than 150k triangular polygons.


Data Cleaning and Optimization

Once the model is scanned and fused it is then loaded into Rapid Works Studio.
There it is cleaned and optimized using a wide variety of tools. It is best to make all of your corrections to your high resolution scans. Once completed to you output copies of your data in a wide variety of resolutions. Rapid Works can be used to output both polygonal and surface data.


Scanned Data Optimized from 150K polygons to 8000, 2000 and 500 triangular polygons respectively.

Preparing the data for Digital Fabrication


While polygons are useful for many digital fabrication processes, I prefer to work with quads. In order to transform the triangular data I use the quadrangulate command in Maya. By turning the hard edges option off many of the triangular faces are made into quads. Starting with a model containing 1000 polys i was able to reduce the model to 500 polys that is composed primarily of quads.


AFSart: BlackManGrove | Resilience II


Wednesday, July 21, 2010

afsART: BlackManGrove Buildup: Thanks Jeff


afsART:BlackManGrove Nkisi
Originally uploaded by afsart

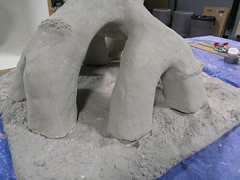
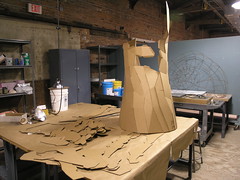
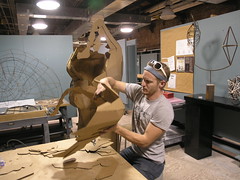
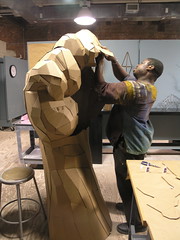
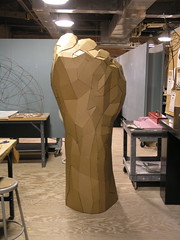
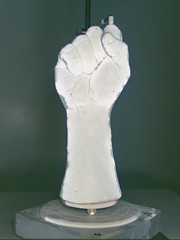
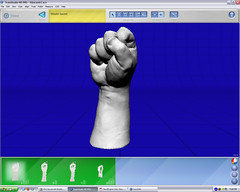
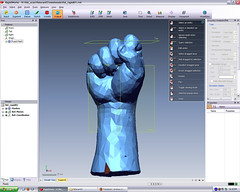
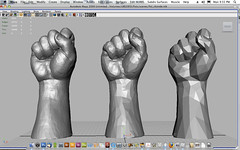
Thanks to some help from student Jeff Doran, we were able to complete the assembly of this model in one evening. Two hands certainly helps to expedite and streamline this process. I will post a more extensive explanation on this work at a later time. It is my first sculpture constructed from 3d scanned data. , thanks again for your help with the assembly on this piece.

Tuesday, July 20, 2010

Super Mario Theme on Stepper Motors

lazzor music! from hypatia on Vimeo.


P.Scott's talk on the music of laser cutters reminded me of this gem. I'd figured this was possible from listening to dot-matrix printers back in the day, but wasn't quite obsessive enough to actually want to try it. Thank goodness for the internet--someone else has!

Monday, July 19, 2010

Rex Brodie - Project 1 CNC Milling

Since my introduction to computer graphics in the late 80’s, I have had a love-hate relationship with the technology. The creative possibilities the computer offers the artist are mind boggling. And since it is the role of the artist to reflect on the culture and technology of his/her times, in our current digital age, it’s logical for the artist to use computer technology. However, for me personally, creating art is not an entirely logical endeavor. In many ways, the journey of the creative process is more important than the final artifact. I much prefer the physical act of working with materials to sitting in front of a computer manipulating intangible 1’s and 0’s in the digital world. While “crafting” a piece of sculpture, the hand constantly informs mind, and the potential for chance situations created by the “workmanship of risk” is always present.

What I find most exciting about the new digital fabrication techniques is that artists not only have the ability to realize new forms on the computer but can now also experiment with variable materials and ideas. By creating sculpture that incorporates machine-fabricated objects with the ambiguity of mark and character of traditional mediums, the artist reintroduces the openness to chance and spontaneity to the process, resulting in an artwork that has the “autographic” character of the artist and best reflects our richly ambiguous world.

Formally trained as a furniture maker, my palette has been primarily wood. However, I have recently become interested in working with metal. Craftsmanship has always played an important part conceptually and technically in the execution of my work. With crafts historical ties to pre-industrial technologies and labor intensive procedures, I plan to create sculpture that juxtaposes hand-crafted forged metal and wood elements with digitally fabricated parts. In doing so, I will show the inherent beauty in both hand and machine-fabricated elements while attempting to raise questions about the role of technology in our society.

Thursday, July 15, 2010

Clay Royse - Milling Project


For my milling project I decided to look back on an old idea - an infographic showing when the states were admitted to the union. The idea of displaying and interfacing with data in a concrete way appeals to me for many reasons, chiefly the more visceral impact an tangible object has over a table of information.


Viewing the passage of time as height data gives each state its own profile, and viewers should be able to interpret the meaning of the piece without an accompanying statement.

Because of its vertical edges, this piece should lend itself well to being milled. I am also interested in using it as a mold- vacuum forming will soften the edges, making the states melt into each other in an interesting way. It will be fun to see how the process transforms the piece.

Jeff Pruitt Project 1 CNC Mill


For this project I wanted to create a modular design that could be unique depending on how you placed each piece but still able to flow smoothly from piece to piece. Using a triangle as my base object I used a single curve on each of the sides of the triangle in order to make all sides able to connect to each other. Using an edge surface tool I created a top. Disliking this I started again on a different design that I could actually stack on top of each other to create small caves within. Disliking this design as well I started fooling around with the two models and decided to combine the two directly on top of each other to create my form.
What I would like to do with it would be to vacuum form it so there is a hollow shell with more open spaces in between.
My only concerns at this point are the vacuum forming and removing the pieces once this is done. More posts will follow as more progress is made.
Jeff P

Wednesday, July 14, 2010

David Markus | Milling Project


I decided to work on a modular surface for my milling study. Each module is a hexagon made up of a smaller array of 7 full hexagons and 6 subsections. The hexagons were first offset and then projected onto a concave and convex shaped to create a dynamic surface.


Since every point touches 3 modules, it is difficult to create a standard repeating modular unit. Instead, I decided on a radial pattern, using convex modules surrounded by concave modules.


One problem I may run into is my use of hard convex angles. These will undoubtedly lose resolution when carved by the round CNC bit, so I am using this as a test to see just how much that effects the overall appearance. Another problem I may run into is chipoff from the steep 90 degree angled edges of the channels.


I will continue exploring my options to better utilize the nature of the tool.

Tamela Sicay-Perrow Project 1 CNC Mill

I have completed the first step in Project 1, a 3d model from which a block of yellow polyurethane foam will be milled out and later molded. Thematically, these are an abstraction of a fruit or melon. Poured casts will be grouped together, and arranged for the final piece. This mould can also be combined to create fully round melon type objects, or partials.
The models were created by manipulating control-points or CV's in Rhino, from perfect spheres to shapes with symmetrically spaced ridges.

More postings will follow updating on process and progression into the final piece, as this perfectly symmetrical milled object is but the means to an end.

Tam

Wednesday, July 7, 2010

AFSart: first mill project

AFSart:mobius stripped

Thursday, July 1, 2010

AFSart: Project1 Milling


7/1/2010

This is the blog posting for the milling project I will be using this image to create a relief using the heightfield command in rhino. This is for a classroom demonstration on how to use the blogsite.I used the iconic image of che gueverra
Heightfield images work by using greyscale information. I want to compare a black and white image with one that has a wider range of values.