Sunday, October 31, 2010
Thursday, October 28, 2010
Matt Dwyer: Seeded Figure Fabrication


After a lot of run-around and setbacks, I laser printed all my parts and have begun assembling the sculpture. The pieces are numbered, but wow, what a task to visualize and appropriate every plane for every notch that makes up the body!
I am so excited to fill it with soil so I can begin planting. I've been thinking about how I will contain the soil within the volume. A friend suggested papier mache over the soil-packed figure, which would be great, I think, because of its biodegradability. I was also thinking perhaps cheesecloth, but papier mache might be the best solution until the plants can take root and solidify the soil.
5 Axis Milling Machine Demonstrates Capabilities

5 Axis Milling Machine Demonstrates Capabilities
A video from Daishin Seiki Corporation, demonstrates the capabilities of a 5 axis milling machine turning a solid piece of aluminum into a motorcycle helmet used as a showpiece for a European exhibition. The machine simply turns the workpiece around to get access to every conceivable spot and the end result is an intricate and precise piece with all of the detail you could possibly expect. There was obviously some excellent programming involved, but once done, this type of work could be repeated over and over with equal precision.
Wednesday, October 27, 2010
Brandy Kennedy Koch-FDM


 Ok where do I start? This is one of the coolest things Ive ever had access to! I cant believe I'm printing stuff in plastic! I used pre-existing models for this project and mixed them up! I had a riot, I'm finally getting a grip on rhino, and I cant wait to post actual pix of my figures! ROCK!
Monday, October 25, 2010
InflataTent
 I started out using a 4-pt star solid. Instead of having the points go in, I made them go out so it became this 8 sided shape. Then I extruded the bottom down about 3 ft so there is some room to walk around the sides where the bedrooms are. I then traced the lines making a floor plane and frame:
After I had these lines I made, what I call, InflataLines. These are the tubes that will be inflated. To do this I selected the curves and used the Pipe command making pipes that are 3" in diameter. I also made the interior walls to block off each room. To make these I just made surfaces going from the ground up, past the top of the tent. These surfaces correspond with the floor plans. Afterward I trimmed the excess surface so the walls go all the way to the roof and stop. I also had to trim the extra surface that goes through the InflataLines so it does not constrict the air flow.
 The last step will be to create the vents for the blower and the air to escape. Most likely this structure will not be able to be inflated once and stay inflated for a night. The inflatable slides and bouncy castles have air constantly being blown through them so the structure stays inflated and strong. I will also be making chairs, couches, and beds that will be inflated individually and will not be attached to blowers or the structure and will be able to be placed wherever you want.
Sunday, October 24, 2010
Arden Saunders: Project 2


For project number 2, polygonal modeling, I decided to warp and distort a skull which I found online. Whether it is my love for the Grateful Dead or my attraction to the human mind and brain, I've always been drawn to the shape and idea of the human skull. So, I took my love for the skull further and mimicked the skull by using the array, twist, and bend tools in Rhino. View a video of the work being 3d printed.
Saturday, October 23, 2010
AFSart:BlackManGrove
AFSart:BlackManGrove
Originally uploaded by afsart
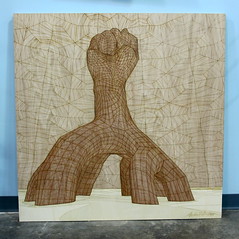
laser engraved wood inlay from 3 different panels that were combined on 1/2 inch plywood panels. The design was engraved and cut on the BEAM.
Friday, October 22, 2010
Wednesday, October 20, 2010
Katrina Brooks - Project 2

Here is my rendering in context. I would have liked to use a backplate more significant to my work, however all images that I tried to use were unsuccessful in Keyshot.


Here is the piece that I created for Beginning Sculptural Processes 2. This was carved out of pink foam, covered with epoxy, and painted with acrylics. The hands and feet were caste in plaster from my own.

 For my second project, I decided to design a model for a sculpture that I am making out of foam and epoxy in another class. The model I have designed is somewhat different from my sculpture. Both have the same pig form with human hands and feet and a bat, which represent a mythological creature. They differ in position and, of course, in material. Photos of my sculpture will be posted soon. My process for the model involved taking various parts of preexisting models and combing them using both Rhino and Maya. I then added the texture by using the extrude tool in Maya.


Claire Abitz: Project 2 FDM


Connor Nicholas - CNC Project using Grasshopper


Applying a geometry to the sine surface


Tuesday, October 19, 2010
Monday, October 18, 2010
More Inspiration

Video: The Secret Life of Plants
The best hour and a half I've ever spent. Plants are awesome! They are more like us than we will ever know. If you have some time, check out this video. Very corny, 70s documentary that analyzes the consciousness of plants, but worth your time. Humanity's present reign on earth is a blink of an eye compared to the amount of time plants, our parents, have been living on and providing for this planet.
Check it!
Friday, October 15, 2010
Andrea Lucas: Project 1 Milling Update

Wednesday, October 13, 2010
Matt Dwyer: Seeded Figure II

Slowly I'm developing a 3D model into a ribbed structure then into planes that I can print on the laser printer which will be assembled into my sculpture. I've been dealing with a lot of frustration on the computer, but with some help from some friends and a lot of time with Rhino, the piece is becoming a reality.
Serge Ruffato: Project 1 Milling
 For my project I chose to make two separate faces to avoid any problems with undercuts. The two faces will be milled separately and will then be assembled together. I made a back plate for each face to facilitate the assembling, but also to provide me with the opportunity to make molds of each face. These could then be cast in plastic, aqua resin, wax or plaster. The back plates will then be cut and sanded to end up looking like the rendering seen below.
 The concept behind this piece was industrial cubism: creating an abstract and visually striking structure with the use of geometrical and mechanical shapes. I have always found a mystical and surrealist atmosphere attached to these kind of structures. My material of choice for fabricating it would be steel or cast bronze. In addition, the abandoned factory background is a perfect environment to advertise the piece.
Mitul Mistry - Project 2 - FDM


I have several years of experience modeling with polygons, so for project 2, FDM, I decided to use ZBrush to sculpt and generate topology, and potentially complement that with forms in Maya.
ZBrush is a very powerful program, and far better for sculpting form digitally than a 3D package like Maya, which is better suited for purposes such as hard surface modeling, topological layout, animation, etc. I strongly urge anyone interested in true digital sculpting to check out either ZBrush or Mudbox.
I started out in ZBrush using ZSpheres to build an armature-like form, and then laying on form using ZSketch. I then converted it to polygonal topology by using a process called adaptive skin, which leaves far more uniform topology than its alternative, unified skin (which generates topology more accurate to your form, but leaves you with much uglier topology). Topology is, unfortunately, a significant concern for sculpting because it affects your brush strokes.
After doing some tests, I should be able to get a 250k poly model into Maya so long as I have enough memory on the computer I’m using. If I subdivide once more in Zbrush, I’ll end up with over a million polys, which is peanuts for ZBrush, but which I don’t feel Maya will handle. 250k is enough to get a reasonable articulation of form, but not nearly enough to hold intense detail, so I will obviously be focusing more on form than on texture.


An Impossible Object That Would Make M.C. Escher Drool
 SCPT250/450 Alum Jonathon Anderson sent me this link which I am happy to share with you. That object you see above isn't a box made of McDonald's coffee stirrers by a meth addict. Nope, "Shadow Cloud" was fabricated using 3-D printing, and it hides a bit of clever magic: Those little panels in the grid seem random, but they actually align at certain angles, thus creating distinct 2-D patterns. Three separate patterns, in fact.
 Which means that when you shine a line through the thing, it creates three separate shadows. Prepare to be amazed: For obvious reasons, that particular piece is called "Thru Religion," and it was created by Drzach & Suchy--it makes perfect sense that the duo has a grad-level background in architecture (that's Drzach) and crytopgraphy (Suchy).
Monday, October 11, 2010
Sarah Matthews: Leaf Platter

After it is milled, I will mold and cast it in different colored plastics and make stems coming off the bottom to hold the platter up.
Sam Lilley: Project #1

 In this first project, I focused on the use of Grasshopper heavily. I strove to create gradients with texture, as seen here. By introducing curves and different angles to the equation, I added a new depth to the piece. It reminded me of some kind of alien keyboard, which is what I have grown to call it.