Thursday, May 27, 2010

Yuma Watanabe: Final Presentation Posting

Since last time I posted my projects,
I made several changes for final presentation.
I would like to talk about them one by one .


For my first project The Laughing Buddha,
I covered him with red plastic and got frame.
I think I could successfully expressed my Asian culture with him.
The color Red is one of the most important color in Asian culture.
It means Anti-Demon. Many legendary Asian artists chose the color red for
the sculpture of Buddha.
The circle takes important role in Buddhism as a life cycle.
Because the goal of the Buddhism is escaping from the life cycle.
These circle on the surface of my Buddha represents the people,
who are supposed to have fun with The Laughing Buddha.


The squid FDM project actually came out with broken arms.
I fixed up at the time of final presentation finally!
The meaning behind this sculpture is
that after the era of human, many biologists says it will be squids era.
So this sculpture represents the end of the human at the same time,
the beginning of squid's era.
I call this sculpture as "Ω"(omega).


As I mentioned in earlier post,
I spray painted my first Laser cutting project.
I actually spray painted this for the reason of craftsmanship
and it came out quite clean.


Mentioning again, the meaning behind this sculpture is
my expression of the life.
Because one's life is beautiful and complicated.
Also, it repeats up and down until the end.


At last, I would like to introduce you my lighting sculpture,
The Face
of Ra(Egyptian god of the sun).
I painted his face with gold because the color gold is really respected color
in Ancient Egyptian culture as all kings' death masks are made by gold.


This sculpture has one big problem that
it doesn't have a whole on the top of his head.
So the heat cannot escape and possibly the sculpture would be on fire.

Anyways, throughout the quarter,
I learned how the digital elements came out to the real world
and this experience will definitely help me to model or get inspired
for the projects in the future.

I would like to give all of my thanks to Prof. Scott
and 3 classmates survived with me until the end of the quarter.
It was great experience and memories.
See you guys later and have a great summer!

Yuma Watanabe

William Gross: FDM Project


William Gross


Using a combination of Rhino3D and Maya I was able to construct a spiky sphere that could be 3D printed. I was focused on creating it for an architectural application where it will be used as a lighting fixture. I created realistic renderings using Hypershot and added them to various scenes to add context.

Esteban Urrea's laser cutter exercise


This exercise was intended to help us understand the format for the laser cutting files, how to set up the images on a template and how to properly color the images. In my case the colors which i used for my application were; red for text, blue for interior cuts, magenta for exterior cuts and cyan for the template. After the files were completed we were to print out the laser cutter form get Professor Scott to sign them and take our files to the guy running the laser cutter. Then pick up our pieces later on that day!

Esteban Urrea's Project 3: Egg


For project three I began with the torus form of a sphere in Rhino. I then created a crater on front side and three pipes which attached the crater to the back side, then set the form on a rectilinear base. Using the "Contour" command I was able to split the form into layers. I cut out two .25 inch squares in each of the layer surfaces, while the form was still a hole. Then I started to unstack, number and place the layers into six 18x32 inch cyan rectangles. Once placed I changed the curves to their appropriate colors, saved the file and sent it to the laser cutter. Once I got back all my pieces I assembled then by running .25 inch dowl rods through the holes cut out prior, then glued the ends for a final piece.

Esteban Urrea's Project 1: Nurbs Tire Tracks


For Project 1 and my first ever attempt at 3d modeling in a computer I created a relief that looked like tire tracks. The process began by creating a surface in Rhino and the image of the tracks in Adobe Illustrator. I then transferred the file from Illustrator to Rhino and extruded the image, placed it on my surface and then lofted them all together. The process I did would have been correct expect I lofted the curves instead of the surfaces. The amount of naked edges was ridiculous and it was time to do it again. Once there were no naked edges the rendering was printed out using a 3 axis milling machine, the material used was a high density foam. The next process was to take Brush On 40, a product from Smooth On and create a mold. After the mold i created a mother mold from plaster and burlap, from there I was able to pour plastic, plaster and wax. I ended up using 2 plaster copies for the final transformation of the piece. I cut along the recessed areas of the relief which left me with with individual pieces of plaster. Then I created another relief on top of black foam core using epoxy as my adhesive.


Esteban Urrea's Project 2: Implied X's- FDM Model


For project two I chose to create a 3d form in Rhino that is based on the principle of repetition. By repeating, enlarging and cutting a diamond I arrived at my three elements; the center diamond and the two opposite facing angles. Then stacking the unit group on top of one another to create the form that now exists. I was able to print 5 copies out of a 8x6x6 block of material, each piece is 8x2.5x1.5.

After the pieces were printed I placed them into a dark lit environment. The enviorment is a 12x20x15 enclosed box with flaps on the front which allow for view to the interior. The interior has 4 of the 5 pieces which are painted silver, wire mesh and a blue and white light. The interior also has music that plays at a low level to help with the interaction of the other senses.

Tuesday, May 25, 2010

Yuma Watanabe Project4


For my project4, I got inspired by the Egyptian god of the sun "Ra" who has falcon head.
So I thought it would be the best shape for my lighting sculpture.
First, I got the picture of falcon head as my template and then started modeling in Cinema 4D as you can see above.


Then I exported Cinema 4D file as 3ds, then imported to the Rhino.
It took a few hour to figure out how I can make the space inside of the falcon head,
but now it is ready to go!


The pieces came out like this... so chaos... but thank god that Prof. Scott told us how to put numbers on the pieces.


This is how I pre-stacked pieces. Since I didn't make whole for the pole, I have to grue them.
But it will be cool lighting sculpture for sure!

Yuma Watanabe Project3


My first laser cutting project took long time to come up with idea.
It is because of that I could not imagine how my pieces would get together in 3 dimension.

So I decided to create simple shape with crazy pattern as you can see that the bigger pieces in the middle are in arch shape about 120 degree which arrow me to create circular form when I connect them together. The smaller pieces simply connect bigger pieces in different height with continuation.


This picture is when I was putting the pieces together.
It actually came out interesting. When you pay attention to the object, you will find that 5 different spirals are supporting each other to create one big form.
Repeating up and down again and again, the sculpture is suitable to be called as my expression of "Life" since one's life is always repeats up/down movement with complicated situation, still goes on until the end.

Today, I spray painted the sculpture in white color and they looks really crucial.
I cannot wait to present them to the class.

Yuma

Jonathan Sells Project 3: Waffle Constructions

Using Rhino and the grasshopper script by Andrew Payne I made the following surface waffle as a test. It took 3 sheets of 18x32 cardboard to complete the X and Y strut curves.


Screenshot


Next, I took the same concept and integrated it into the goblin bust geometry from project 2 except I decided to take the ears off since the pieces would be too small. A similar workflow was executed here though I used pipes for the intersections where the X and Y strut notches will be. The cutMyOwnRibs.rvb script did not produce favorable results so in turn the process was done manually using pipes on those intersections and then cutting the surfaces. After this I used the massiveUnroll.rvb script to produce my curves for the laser. This project took 11 sheets of 18x32 cardboard.

Notch thickness: .24 (cardboard)


Monday, May 24, 2010

Laser-Cut Project


William Gross

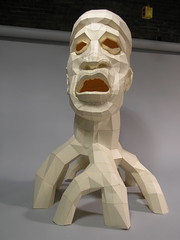
Using a head model in Rhino3D I was able to input a contour command to create lines spaced out evenly on top of the surface. I then took those lines and laid them flat so they could then be lasercut out of cardboard. There was a total of 3 sheets of 18"x32" cardboard. Using the holes I created, I inserted a threaded rod through to hold the pieces together and give the sculpture some weight. Each piece is spaced with washers to separate the shapes.

CNC Mill Project


William Gross


Using Rhino3D and a 3-axis mill I was able to create a surface that exhibits both flow and proud form. Two large blocks of high-density foam were milled out and then covered with a urethane mold making material called brush-on 40. After the urethane mold dried, plaster and burlap were used to create a mother mold that gives it strength and rigidity. Concrete was the casting material I used to achieve a sense of considerable weight combined with a free flowing shape. The base is laser-cut acrylic that was then stacked and sandblasted to to get a shape that could light up with an RGB LED and also hold up the weight of the sculpture.


Saturday, May 15, 2010

Jannelle Wheelock: Starting the base


So I went and picked up the wood to start the box that will be below the wheel and hold all the electronics. It was quite interesting trying to bike with it - it was heavier than I expected.

One of the most difficult parts of constructing this piece is that I want to make it so I can take the entire thing apart and collapse it down so I can ship it to California without worrying about it getting crushed.

Todd, at the Boundary Hall wood shop, helped give me advice on the construction of the box, showed me the different tools and how to use them. Thank you Todd!
I started off constructing the pieces for the octogonal shape. I cut all the pieces to size so I could contruct it the next day.

I then moved on to construct the bottom of the box. All the pieces were put through the planar tool, glued together, and left overnight to glue

Thursday, May 6, 2010

Janelle Wheelock: 3-D Zoetrope


So my project has been an interesting one so far. I had to animate the expressions, duplicate each head out, prepare all 35 heads for the FDM printer and convert them to STL files. I sent them to the printer and am currently working with Will Gross to configure the motor part of the Zoetrope.
I need the dimensions of the motor and accessories before I can finalize design for the box that will go below the spinning zoetrope part.


afsart: BlackManGrove Pepakura


afsart: BlackManGrove Pepakura
Originally uploaded by afsart

BlackManGrove Pepakura Study II. Modeled in 3d Studio Max. UnWrapped using Pepakura Designer paper unfolding software. www.tamasoft.co.jp/pepakura-en/. Laser cut tagboard. Model is composed of 159 pieces that are glued together.. 4.5'x4'x3.5'app. The next step will be to coat the paper with a material that makes the sculpture permanent.

Tuesday, May 4, 2010

afsart: BlackManGrove Pepakura Study


afsart: BlackManGrove Pepakura Study
Originally uploaded by afsart

As an introduction to the laser cutting segment of the course I thought that it would be interesting to share this exploration of digital fabrication and laser cutting. Pepakura (http://www.tamasoft.co.jp/pepakura-en/) generates unfolded geometric templates from 3d computer data models. While designed for paper it has applications far beyond that material. It works best with low poly models.