Friday, November 19, 2010

InflataTent

After making my InflataTent in Rhino, I used the unroll command to make pattern pieces. I selected the unrolled pieces and exported them into Illustrator. In Illustrator I made seam allowances for each patter piece by copying each path (individually) and shifting it over about 1/4". I then saved them as a PDF and printed them on the plotter. I taped the pattern pieces on a table w plastic sheeting on top and traced the patterns. I learned how to do this thru sewing, but cutting fabric is a lot easier than cutting plastic sheeting. When cutting fabric I pin each pattern piece to the fabric so it is the exact same size as the pattern piece. I could not pin the pattern piece to the plastic because it would rip and I would be left with holes that might inhibit the tent from inflating. I tried to tape the plastic sheeting as taut as possible, but the bigger the pattern piece the harder it was to stretch it out flat. As a result the pattern piecesweren't perfect and they did not fit together perfectly.

After tracing and cutting each piece I constructed the tubes. I used packing tape to seal the seams. First I put tape down one long side on the back then I rolled it over a piece of 2x4 with the adhesive of the tape facing up on top of the 2x4. I took the other side of the plastic and made sure the middle and corners lined up. I tried to make the seams as flat as possible by pulling the plastic taut while taping it. After getting the inside tape done I went over the seam again with tape for reinforcement. This also helps to make the tubes air tight. I ended up with 7 sets of tubes each with 4-8 pieces.
Although I did not finish the construction of the inflatable, I learned a lot from the process. The first thing I learned is that I should have made it out of vinyl or pvc coated fabric so I could sew it. Sewing is a lot easier than working with tape and plastic. It is also more professional since that is how the inflatables for moon bounces are constructed. I also learned more about working with Rhino. In the past I have had a lot of issues using the BolleanUnion command. This time I figured out why I was having problems with it. After making my tent about 3 times I realized that some of the parts were at too extreme of an angle and not intersecting the other part in the right place. I adjusted them and got every piece to Bolean correctly. This allowed me to have the exact pattern pieces to have a completely hollow frame to be inflated. I also learned how to export the pieces into Illustrator, something I never knew I could do before. Being able to work with Rhino and Illustrator for this project helped a great deal in making the pattern pieces. As much as I don't like working with computers that much, I can see how helpful it can be with certain sculptural processes.

I will be completing the inflatable over the break, hopefully I will be able to figure out how to get each tube to fit correctly. I also really want to do this with fabric and sew it so I might try to find the fabric somewhere in America, since I had been looking before and could only find a supplier in Europe.

Wednesday, November 17, 2010

Sam Lilley:: Laser Studies cont.


Fully loaded and fully assembled. About 18" tall and 14" wide. Fits on a stand, I may modify it to fit on a wall!


Sam Lilley
Jeweler :: Metalsmith :: Designer

Connor Nicholas - laser studies

Here are a few laser studies. One is through a waffle definition on grasshopper. The other is contoured in rhino.


Connor Nicholas - Voronoi Tower


In this project I explored the fabrication techniques of unfolding geometry and pepakura and the construction. The spacial and experiential qualities of the voronoi began to develop as I added and subtracted from the geometry.


john mcmahon: teef(3D scanning)

i never messed with a 3D scanner before
so that was something i definitely wanted to test out
for my first scan i wanted to keep it simple
was searching for an object to scan and came across
my friend sam's car sculpture that was laying around
scanned the car but at a super high resolution
which didn't leave much room on the computer to complete the steps for outputting
after referring with prof. scott, he told me to step the res. down
so i scanned my teeth(a plaster model of my teeth)
the goal was to scan the uppers and lowers and alter them
and output to the wax printer in the jewerly building
but once i over came the scanning process
i ran into some issues with offsetting the surfaces to create digital "fronts"
the offset that the wax printer needed to meet the minimum output
was to much for rapidworks and rhino to do a simple offset
the larger offset was producing self intersecting surfaces
a no no in rapid prototyping
need more time to troubleshoot through this issue


madebymixta

john mcmahon: Corrugation - Plica cont.

got caught up in the rush so there is a lil gap in the pics
painting, cement casting and acrylic bending was not recorded
but i have the jig i used for bending the extruded acrylic rods
and then i jump right to the presentation pics, fdm 1/4 scale model,
and model in context(museum)


Serge Ruffato: Papakura Final


This is the FDM maquette I worked from for this project. I basically exported the file from rhino to maya and then lowered the number of polygons in the mesh until I obtained a simplified version. Then I exported it to Papakura to unfold it and prepare the files to be laser printed.


This is the finished product! It's about 4 to 5 feet tall and it stands on it's own. This is my first experience with Papakura, I'm excited to explore it's potential.

Andrea Lucas: Laser Study Final

Waffle Structure


There were man issues to overcome concerning this waffle structure but the disarming and arming of pieces helped me understand how the components worked together. The piece was strong enough to stand on.

Serge Ruffato: Laser cutting exercises

Exercise n1: The idea of notches was interesting, it introduced me to the laser printing process. Although it opens a wide variety of possibilities, it provided a pretty basic and rigid type of structure.

Exercise n2: This was a very simple, yet extremely useful approach to laser cutting. It's perfect for creating armatures, you can cover it with plaster, epoxy, aqua-resin, etc. It will provide a very solid and compact base to work.

Exercise n3: This process is a little more complicated, I chose to work with the cutyourownribs and massiveunroll scripts. All you need to do is type in your material thickness and the script pretty much cuts it out for you. Then you use the massiveunroll script to lay out your ribs and it will even number them for you, which is very convenient. This approach requires more work but also lowers the amount of material needed, which means it's a lighter armature and more appropriate for large structures. Very useful knowledge!

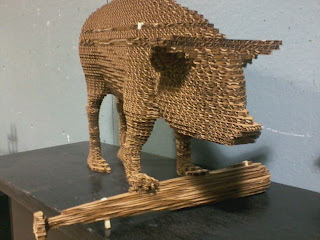
Katrina Brooks - FINAL


For my final project, I chose to use my FDM model. I enlarged it to fit the ULS laser, although they decided it would be quicker to print with the beam. Six different 1/4 inch dowels were used to hold it together. Many of the contours needed to be fixed before printing. Overall, I am happy with the result, although I wish that they had not rotated the cardboard when they printed it, as this made the corrugation irregular.

Andrea Lucas: Laser Study III


My favorite piece: it was inspired but Indonesian shadow puppets. The original drawing was converted into vector lines and picked to produce a relief sculpture, reinforcing the original idea of shadow arts.

Andrea Lucas: Laser Study II


Creating interlocking pieces for a sculpture that has the ability to grow.

Andrea Lucas: Laser Study I

Katrina Brooks - Laser Exercises


The first exercise was the notches. These were cut out of luan.


For the serial stacking exercise I used my model from the CNC milling project. Contours were made from the model using the width of 2ply cardboard. A 1/4 inch dowel was used to hold it together.


The final exercise was waffle structures. I created a simple shape on Rhino: a cube with a sphere cut out. I then used the Grasshopper script to cut the notches and layout my pieces before having them cut from cardboard.

john mcmahon: tip top cont.

so this model didn't make it to the final presentation
due to some technical difficulties, i have to remember when some part of the process is new to me i have to leave extra time for troubleshooting
to continue the model journey
after sanding i made some extra parts out of urethane foam to act as a draft angle
and it follows one of my guidelines
if it doesn't have to look pretty make it look as ugly as possible
to the big vacuum former to pull 1/8" styrene 26" x 26"
i only wanted the top surface, all the extra is for the cause
trimmed the styrene and left a whole in the center to add strips of styrene
these strips were going to be a playful, over lapping and weaving to create a lighting piece
getting the strips to act the way i wanted is where i had trouble
using straight styrene strips had to much tension in them and would not hold the shape i was after
the glued bond kept on failing
so i went to heat forming but once the heat was introduced
the strips had to still relax and to keep them in position while they heated up was more difficult then i realized
the size of the styrene strips were 12"long by 1/8" by 1/8"
oh i love process pics


madebymixta