Showing posts with label laser study. Show all posts

Sunday, March 11, 2012

Jake Ellis: Exploding Sphere


Over winter break I attended Art Bassel in Miami Florida and in the Design District on opening night, I came across an exhibit of R Buckminster Fuller's work. There was a 20 foot Geodesic Dome lit up in an open field surrounded by shipping containers full of Fuller's drawings and writings. I was inspired Fullers Domes. Not only by his engineering achievements but in my mind his domes radiated space and as if emblems of the future. Growing up in Titusville FL I witnessed a fair share of shuttle launches and have always been interested in space and a world outside of our own. My piece, "Exploding Sphere," intendeds to remind the viewer that there is a world outside of our own. This last fronteer has yet to be explored. It is vast and full of wonder.

I achieved my concept through a digital fabrication process. I began in Rhino, modeling each of my parts and then running them through a script in Grasshopper that create a waffel like structure. I laser cut these parts and coated each piece in cheese cloth and Sculpt-or-Coat. I then finished it with Graphite, and Clear Coat.

Here are some screen shots and photographs of my proceses.

Rhino Model


Key Shot Rendering
Progress Photos


Laser cut pieces
Waffel Structure
Sculpt-or-coat


Ready for installation


Finally here is a rendering I created in Maya and laser engraved onto wood


Monday, March 5, 2012


Exploding Sphere Rendering by Jake Ellis.

Experiments with Maya's Vector Render and the Laser cutter.


Sunday, February 5, 2012

Rex Brodie - Laser Studies

Ah ... the existentialist funk of turning fifty makes one question what it’s all about.

Historically, the role of the artist has been to present us with ideas and perceptions for our contemplation.  The goal of many artists has been to create a “critical consciousness” that questions cultural traditions. As Suzi Gablick points out in her book Has Modernism Failed:

"There is always a correlation between society’s values, directions, and motives and the art it produces. Modernism, as we have seen, has cultivated its objects largely as a mode of cultural resistance–as antidotes to a bureaucratically administered and overrationalized way of life."

The inclusion of forms derived from digital fabrication techniques into my work is an attempt to explore the relationship between technology and society. I agree with historian Merrit Roe Smith’s theory of technological determinism, “the belief that technology is the key governing force in society.” Utopian visions of technology and the notion of “technology as liberator” have been instrumental in shaping the construct of our reality. As an artist, I believe it is important to think critically about the uses of technology.

One of the pieces I’m currently working on, Life Force, clings to the romantic modernist notion that the mark of the artist is a uniquely individual expression of the spirit. The bone-like forms in the sculptures are mechanically reproduced on the laser cutter and assembled into organic compositions. Conceptually, the process is as important as the final art object. By using the technology of industryparticularly, the digital fabrication technology used by “commodity-producers” of aesthetic “goods”in an improvisational manner and juxtaposing the precise repetitive machine made parts with the free-form elements created by the artist's hand, I hope to create a sculpture which questions technology’s impact on our identity and perception of self. 


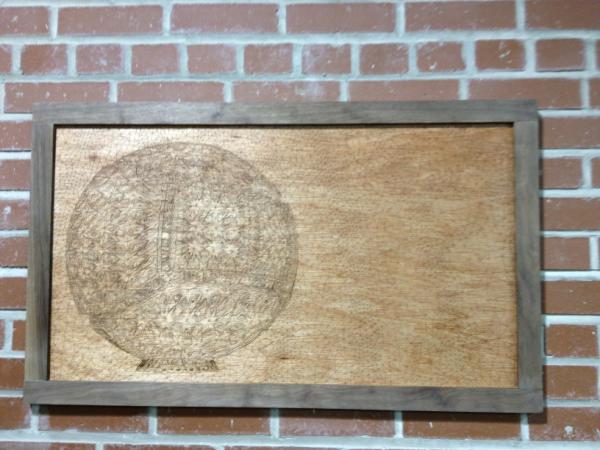
With no preconceived form in mind, I experimented in Rhino until I discovered an appropriate shape.


I brought the shape into illustrator to change the scale and create the file for the laser cutter. The notch was added after doing some experimenting upon receiving my first batch of laser cut parts. 


Prior to this quarter, the sculptures I’ve been working on have been an exploration of the impermanent nature of life. Variable building materials, some with long histories of being used for structurally sound objects like shelter and furnishings, are precariously held together with clamps and zip ties.

Continuing with this concept, the first avenue I followed was to create a wooden form held together with thumb screws and pressure-fit joints. The only permanent part of the structure is the bent lamination in the middle of the piece which was necessary for support. The other bent forms were createdwhile listened to Miles Davisusing a hot pipe method.


Like the pinch clamps and zip ties, the thumb screws are paradoxically both captor and liberator. While they allow me to bind materials together, they also liberate me from making permanent connections … allowing for greater freedom for improvisation. 


Moving away from the idea of impermanence, I decided to explore the use of steel as a supporting structure. Steel allows for a variety of different forms not possible with wood. However, it is much more difficult to control and does not allow the subtle twists and bends that wood does.

I was thinking of my father-in-law and his Alzheimer’s when I decided to add the neuron-like forms made from zip-ties and tile spacers. Still a work in progress ... I’m not exactly sure of where this one is headed but then that’s the nature of the unknown.


Update: 2/16/2012
The piece continues to evolve … decided include some more direct biological references by replacing the metal base with some representational (1/2” ply) hip bone cross sections.


Update: 3/9/2012
Several hundred parts cut and ready to assemble into a site responsive piece


Lately, I’ve been fascinated with the residual materials left over from the art-making process. Serendipitously, happy accidents often occur, and sometimes the remnants can be really spectacular. This is often true with the “waste” materials from the laser-cutting process. In this experiment, I am using the cut-offs from my laser cutting as well as some that I have found in the trash. Although my past use of color has been limited and I don’t really know what I’m doing with the pastels, I enjoy the process immensely.  Who knows, maybe an “art” object will be the end result.


Ode to Brian Dettmer

Brian Dettmer creates some truly amazing sculptures from old books. When he gave a lecture at SCAD last year, I had the good fortune to have a studio visit with him. What I like best about his work is his process: when he begins a piece, he has no preconceived plan. As he excavates the book, he allows what’s inside to dictate the direction he follows and to reveal the piece's meaning.  Reminds me of a quote from the artist Paul Soldner:.
“There can be no fear of losing what was once planned, and there must be an urge to grow along with the discovery of the unknown … make no demands, expect nothing, follow no absolute plan, be secure in change, learn to accept another solution, and, finally, prefer to gamble on your own intuition.” 
I thought it would be interesting to cut a book with the laser cutter. My original concept was to create a piece about the abject of beauty in art. I wanted to slice a Victorian lace pattern from a book on contemporary art and then rearrange the pages into a sculpture. Unfortunately, laser burns the book more than I had hoped. The lace pattern was too tight, and the book caught fire when we tried to run it! I had to settle for a simple geometric shape.


Not exactly what I had in mind, but the end result was visually interesting. However, it would be difficult not to get some interesting combinations when you’re working with images of work created by great contemporary artist .


To date, I have created several forms using the serial slicing techniqueI really like the texture and patterns of the cardboard.  I will combine these with some forged steel elements later in the quarter.

Update: 2/21/2012

Working old school using Professor Scott’s manual approach for creating ribs…


Tuesday, November 15, 2011

Lazer Cutting

The Mind, The Cage
Jake Ellis


While exploring the serial slicing/laser cutting process, my goal was to create a piece that explored the dichotomy between the structural and the free and flowing. I often find that logic and reason incarcerate my emotional intuition and while quiet possibly that's a good thing, I can't help to wonder who I would be with out the cage that my experiences have created and which I exist in every day.


Rhino Model


Render 1


Render 2


Wednesday, March 30, 2011

Serge Ruffato: NOSE

Nose was my first computer generated steel sculpture. Here is a brief description of my work-flow.

First I looked through the object bank in Gulfstream to find a face with an appealing nose. I Imported it into Maya, cropped it down to the section I was interested in. Then I altered the mesh to reduce the amount of faces and get rid of the steep angles. Here is a quick rendering.

I enjoyed the mesh style because it balanced the inside and the outside parts of the structure, giving an 'in the round' quality instead of having all the attention on the front side. From this point, thanks to P. Scott's help, I used Pepakura to unfold my model into an origami lay out. Then prepared the file for laser cutting using Illustrator and Rhino. I used cardboard as my material because of it's sturdiness and low cost. Once the laser cutting done, I used each cardboard flaps as templates to duplicate the faces in steel.

Precision and labeling were the key to success. There were approximately 140 faces to reproduce in steel, so I had to make sure I kept track of each ones positioning. Once I had all my faces done, I assembled the cardboard version of the nose.

Assembling the nose in cardboard first was essential to get all the angles right before I started the steel, because as you might have noticed steel isn't flexible.. Now all I had to do was tape each steel part to it's matching cardboard face and weld all of them together.

Work in Progress. The modular aspect of the structure was important for transportation purposes. I used bolt connections along the inside, which I can remove once I find a permanent location for it. Now begins the long labor of filling in the gaps with the remaining parts.

The finished piece at it's temporary location, Boundary Hall. It is evenly balanced, which enables it to stand on it's own. Nevertheless I'm working on a base design to elevate it from the ground and bring it up to eye level. Here is an image of the inside view

And one for the scale! I enjoy the dancing contrast between the tac welds on the inside and those on the outside. Now I need to figure out what to do with a 5 foot steel nose. Anybody interested ha. Thanks again P. Scott, amazing project that taught me a bunch both on digital and direct metal sculpture.

Monday, March 14, 2011

Mason Eisenberg: Laser Exploration

Urban Rain Catcher


The concept behind this is water filtration. Something that can be placed in a dense urban environment and both catch and filter water throughout itself. It would serve as both a sculptural and functional rain catcher.


Wednesday, November 17, 2010

Serge Ruffato: Laser cutting exercises

Exercise n1: The idea of notches was interesting, it introduced me to the laser printing process. Although it opens a wide variety of possibilities, it provided a pretty basic and rigid type of structure.

Exercise n2: This was a very simple, yet extremely useful approach to laser cutting. It's perfect for creating armatures, you can cover it with plaster, epoxy, aqua-resin, etc. It will provide a very solid and compact base to work.

Exercise n3: This process is a little more complicated, I chose to work with the cutyourownribs and massiveunroll scripts. All you need to do is type in your material thickness and the script pretty much cuts it out for you. Then you use the massiveunroll script to lay out your ribs and it will even number them for you, which is very convenient. This approach requires more work but also lowers the amount of material needed, which means it's a lighter armature and more appropriate for large structures. Very useful knowledge!

Katrina Brooks - Laser Exercises


The first exercise was the notches. These were cut out of luan.


For the serial stacking exercise I used my model from the CNC milling project. Contours were made from the model using the width of 2ply cardboard. A 1/4 inch dowel was used to hold it together.


The final exercise was waffle structures. I created a simple shape on Rhino: a cube with a sphere cut out. I then used the Grasshopper script to cut the notches and layout my pieces before having them cut from cardboard.

Tuesday, November 9, 2010

Mitul Mistry - Laser Studies


While the notching exercise was great fun (I felt like I was making my own K'NEX), I feel that serial planing has great potential, as it is fairly descriptive of form.

The waffle form was a nightmare, as the Cut My Own Ribs/Massive Unroll scripts did some very unfortunate things, like randomly flipping some of the flat planes, mis-numbering the pieces, and laying out the notches in an inopportune manner. It was basically impossible to put together because half the notches went in one direction and half in another (and I didn't realize this would be a problem until too late), so I had to cut up the pieces with an exacto knife just to get them to fit.

The Pepakura form was also problematic, primarily because I used cardboard, which has thickness and significantly affects how you can put the pieces together. Because of the thickness, the flaps were largely useless and I had to cut most of them off, and had to make cuts along the folds. All in all, it took me far longer than I expected just to make my stupid rocket ship.

I think I'll stick to serial planing for my final laser project.