This post will provide a brief and concise overview of the laser scanning process and the application of the scanned data to digital fabrication.
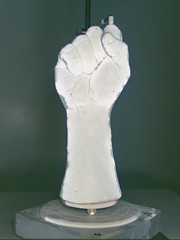
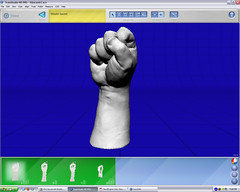
It begins with a laser scan of a fist created from an algeanate cast. The scan is created using The NextEngine desktop 3d scanner.
Note the red dots on the models below. They are registration Pins used to align the various scans created as the model spins on the platen. After reading the operations manual I repainted the model white. Matte surfaces were also recommended to improve scan quality.

Once the scanning process is complete the registration pins are used to fuse the scanned parts together. The parts are scanned into families. Within each family only one pin location is needed to fuse scanned parts together. In different scan families at least 3 pins are needed. Each family represents a different orientation of the model. Once fused the models generally have more than 150k triangular polygons.
Data Cleaning and Optimization
Once the model is scanned and fused it is then loaded into Rapid Works Studio.
There it is cleaned and optimized using a wide variety of tools. It is best to make all of your corrections to your high resolution scans. Once completed to you output copies of your data in a wide variety of resolutions. Rapid Works can be used to output both polygonal and surface data.
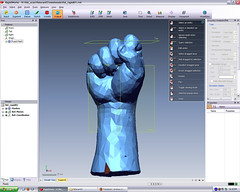
Preparing the data for Digital Fabrication

While polygons are useful for many digital fabrication processes, I prefer to work with quads. In order to transform the triangular data I use the quadrangulate command in Maya. By turning the hard edges option off many of the triangular faces are made into quads. Starting with a model containing 1000 polys i was able to reduce the model to 500 polys that is composed primarily of quads.
Once the model is scanned and fused it is then loaded into Rapid Works Studio.
There it is cleaned and optimized using a wide variety of tools. It is best to make all of your corrections to your high resolution scans. Once completed to you output copies of your data in a wide variety of resolutions. Rapid Works can be used to output both polygonal and surface data.
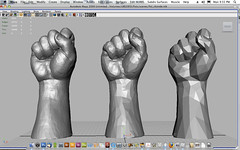
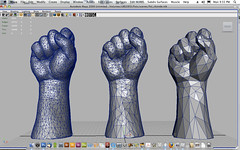
Scanned Data Optimized from 150K polygons to 8000, 2000 and 500 triangular polygons respectively.
Preparing the data for Digital Fabrication
While polygons are useful for many digital fabrication processes, I prefer to work with quads. In order to transform the triangular data I use the quadrangulate command in Maya. By turning the hard edges option off many of the triangular faces are made into quads. Starting with a model containing 1000 polys i was able to reduce the model to 500 polys that is composed primarily of quads.
No comments:
Post a Comment