Much of this project stems from my interest in Sol LeWitt's work. Specifically his use of the grid in his projects and the way in which he experiments with solid and void constructions within this matrix.
 Sol LeWitt, (American, 1928-2007) ABCD 9 (Row), 1966, refabricated 1994 Painted steel. Platform and nine elements 20.375 x 102.25 x 30.5 in.
Sol LeWitt,(American, 1928-2007) Serial Project No. 1. (ABCD), 1966, Baked enamel on steel units over baked enamel on aluminum, 20" x 13' 7" x 13' 7" (50.8 x 398.9 x 398.9 cm). |
 Initial ideas about surface manipulation.
 Forming and separating the surface led to ideas about tiling.
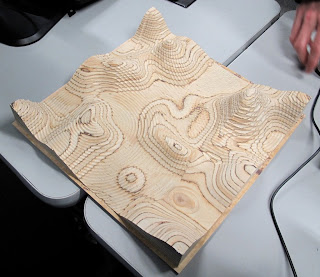
 A surface was generated in Rhino so that it could be tiled across the floor to command presence in the room. The green lines represent the tooling path which will be followed while it is being milled out on the CNC. After the milling process is complete, a mold will be made of the surface so that many many plaster casts at different heights can be made to tile throughout the room.
 Just waiting until it gets milled.
 milled
_________________________________________________
SILICONE
The next step in the process was the application of a silicone mold to the cnc form.
First Layer
__________________________________________________
Plaster
First plaster was mixed to the correct consistency, then it was pured into the silicone mold and allowed to cure while securing the edges with clamps so as to gain extra depth.
 After curing the silicone mold containing the plaster was removed, then the silicone was peeled away.
 After removing the plaster molds I used a rasp to hone the edges to be as clean as possible.
 Just kept at it and tiled away.
____________________________________________________
Sealing and Painting
After casting my tiles I then transported them to a friends house where I had full access to a spraygun as well as other shop equipment which is used for their business. First, the tiles were sealed with Killz primer. Two coats on each tile. After allowing them to dry, two more coats of a thinned out latex white paint was sprayed. I had to be pretty careful when spraying them as I did not want the paint to fill in the tool path which was in my plaster tiles.
one coat
 Two coats
Detail remains

As well as sealing and painting the tiles, I also constructed a base for my piece. The idea of the plane or base is to allow a visual extension of the piece into the space around it. I also slightly floated the base making it appear as if it is hovering above the ground plane, this dimensionality makes the grid of tiles which is very ordered a little more balanced as it contrasts with the loose floating feeling of the "heavy" base. I used the spray gun on the base after I built that also.

Tape was then applied in a grid so that i could have a framework to experiment with different tiling patterns.

 Float.
a hypershot rendering of your proposed installation would be helpful.
ReplyDeleteNice update chris, the picture is coming into focus
ReplyDelete